Call 571-568-6856
  • Home
  • Services
    • Residential >
      • Air Conditioning Repair
      • Plumbing Repair
      • Furnace Repair
      • Heat Pump Repair
      • Tankless Water Heater
      • Heating Maintenance
      • Heating Unit Replacement
      • Emergency Heating Service
      • Indoor Air Quality Systems
      • Nest Thermostats
    • Commercial >
      • Commercial HVAC Service
      • Commercial AC & Furnace Services
      • Commercial Water Heater Service
      • Commercial Rooftop Unit Services
      • Commercial Plumbing
      • Apartment Heating Repair
      • Commercial Heating Maintenance
      • Commercial Duct Cleaning
      • Heating Preventive Maintenance
  • About Us
    • How It Works
    • Why Choose Us
  • Near Me
    • Alexandria, VA
    • Annandale, VA
    • Arlington, VA
    • Burke, VA
    • Falls Church, VA
    • Springfield, VA
  • FAQ'S
  • Contact Us
  • Free Estimate
  • Resources
    • Business Listings
    • License and Certifications
  • Blog
Heating Repair Alexandria, VA
  • Home
  • Services
    • Residential >
      • Air Conditioning Repair
      • Plumbing Repair
      • Furnace Repair
      • Heat Pump Repair
      • Tankless Water Heater
      • Heating Maintenance
      • Heating Unit Replacement
      • Emergency Heating Service
      • Indoor Air Quality Systems
      • Nest Thermostats
    • Commercial >
      • Commercial HVAC Service
      • Commercial AC & Furnace Services
      • Commercial Water Heater Service
      • Commercial Rooftop Unit Services
      • Commercial Plumbing
      • Apartment Heating Repair
      • Commercial Heating Maintenance
      • Commercial Duct Cleaning
      • Heating Preventive Maintenance
  • About Us
    • How It Works
    • Why Choose Us
  • Near Me
    • Alexandria, VA
    • Annandale, VA
    • Arlington, VA
    • Burke, VA
    • Falls Church, VA
    • Springfield, VA
  • FAQ'S
  • Contact Us
  • Free Estimate
  • Resources
    • Business Listings
    • License and Certifications
  • Blog

Blog - Air Conditioning Repair

HVAC Repair

Furnace Repair

HVAC Contractor

How do Mini Splits Work in Cold Weather?

5/30/2024

0 Comments

 
Mini splits are a type of air conditioner and heating system known for their ability to effectively control the climate within a space, despite extreme temperature changes outside. Unlike traditional systems, which can struggle when outdoor temperatures hit extremely high or low points, mini splits are designed to eject and absorb heat even during cold weather.
​When the mercury drops, the performance and efficiency of standard HVAC systems often decline. This is not typically as perceptible during the hot summer months but becomes dramatically apparent with dramatic drops in temperature. However, many mini splits are equipped to handle these drastically low temperatures. Through advanced technology, they continue to function by extracting heat from the outside air, even when it feels frigidly cold. This ability to maintain operation without a significant loss in efficiency is what makes mini splits so valuable in extreme conditions.
Picture

Mini Split Temperature Ranges

When the weather turns cold, many homeowners wonder how well their mini splits will provide heat. The ability of these systems to effectively heat your home largely depends on the type of unit and how it's designed. Some mini splits are designed specifically for low temperatures, capable of operating efficiently in cold climates throughout the year without the need for a supplemental heater.
Units vary from economy-level to mid-level and higher-end models, with each offering different levels of heating efficiency. For instance, while economy-level models may struggle to keep up when the ambient temperature drops severely, mid-level and advanced systems use more robust technology to provide warm, consistent air. These higher-end models maintain their efficiency even when the weather is frigid, making them suitable for places that experience moderate to low temperatures for extended periods.
​From personal experience, upgrading to a higher-quality mini split transformed my winters, turning what used to be a chilly ordeal into a comfortable season, even as the temperature outside dipped below freezing.


Higher-Heat Mini Splits for Extreme Cold

When you live in an area that experiences frigid winters, you should consider a heat pump mini split system. These systems are designed to work efficiently even when the temperature dips below zero. One important factor to look at is the HSPF (Heating Seasonal Performance Factor) rating. This rating shows how well a system can perform in cold conditions.
Some brands have designed mini split systems specifically for cold weather solutions. These systems have higher heating capabilities and perform with greater efficiency in extremely cold temperatures. For example, two brands that offer these cold weather solutions are well-known for their advanced technology and reliable performance. When the temperature drops, these systems maintain their efficiency, ensuring your home stays warm and comfortable throughout the winter.  
The two brands below offer great cold weather mini split solutions.
  • Mitsubishi Hyper-Heating
  • LGRED High Heating Capacity​

Outdoor Unit Installation in Cold Weather Areas

Mini splits are efficient heating systems even in cold weather. They use an outdoor condenser to absorb heat from the air and transfer it inside. The system operates by circulating refrigerant between the indoor and outdoor units. Even when it’s winter, mini splits can extract heat from the air and warm your room.
​Installing the outdoor unit correctly in cold weather is crucial. Ensure it has adequate clearance from walls and overhangs to prevent snow and ice from building up. It's best to elevate the unit high enough off the ground to avoid anticipated snowfall coverage. This positioning helps the unit operate correctly and greatly impacts its efficiency. Additionally, a shelter or roof over the unit can affect its performance well by protecting it from harsh elements. Proper spacing and positioning are key to ensuring your system operates efficiently and reliably all winter long.

Improving Heating Function in Cold Climates

Running a mini split in extremely cold conditions can be challenging, but it's essential to maintain optimal performance. Mini splits use a special mode called defrost mode to remove frost from the outdoor coil. This mode periodically switches on and melts the ice buildup. The dripping water then flows into a drain pan, preventing the fan blades and fins from freezing and expanding or cracking.
To further prevent damage and ensure the mini split works effectively, a Drain Pan Heater is strongly recommended. This heater plugs directly into the control board of the outdoor condenser and turns on automatically when subfreezing temperatures are detected. It helps escape frozen water and reduces the chance of ice buildup thick enough to cause another problem or the need for repairs, which can cost up to $1,000. Different brands and models may have varying features, but using these tips can help keep your mini split in top condition.

Improving Cooling Function in Cold Climates

When relying on a mini split system to cool a server room or a busy kitchen in cold weather, it's critical to ensure the system continues to function year round. In extreme cold conditions, using the appropriate system is key.
From my experience, when the cold outside air is moving too quickly, it can cause the system to fail altogether. Wind baffles can alleviate this problem by blocking the wind from blowing directly on the condenser unit's fan. This helps control the air flow across the coil.

Be aware that selecting the right mini split system and properly installing wind baffles can significantly improve the performance of your system in cold weather, ensuring it operates efficiently and reliably even when temperatures drop.

FAQ'S

Q. How cold is too cold for a mini split?

​Mini splits work efficiently in cold climates but can struggle below 20°F and 0°F, decreasing efficiency and requiring longer run times. A base pan heater can help by preventing ice buildup. While generally reliable, very cold temperatures might necessitate supplemental heat to maintain indoor comfort.

Q. Do mini splits freeze in the winter?

​In freezing temperatures, mini-split systems can develop frost and ice on the condenser coil and other coils due to moisture. To prevent this, they have a defrost mode that melts the ice and keeps the system running efficiently.

Q. What are the disadvantages of a mini split system?

​Mini splits work in cold weather by using inverter technology to adjust compressor speed for efficient heating. They use heat pumps to draw outside air without needing ductwork, ensuring energy savings and comfort in low temperatures. However, they have a high cost, limited cooling capacity for large spaces, and may struggle in extreme cold.

Q. Should I turn off my mini split in cold weather?

​It's best to keep your mini split on in cold weather. Turning it off can lead to higher energy costs and less comfort purposes. Homeowners should let it run to maintain warmth and save dollars over time. This is the best advice for consistent heating and efficiency.
0 Comments

Common Problems with Thermostat

5/24/2024

0 Comments

 
​In the US, smart thermostats have grown in popularity over time. Indeed, between 2021 and 2027, the thermostat market is projected to expand at a compound yearly growth rate of 12.7%. Thus, if you're looking to enhance your Alexandria home, you might want to give a smart thermostat some thought.
At the moment, the Nest thermostat holds a prominent position among the top smart thermostats due to its ease of use, effective home management in Alexandria, VA minimal input requirements, and superior appearance. It adjusts the settings to save even more money by detecting when you are at home or away.
Even while Nest thermostats work incredibly well, occasionally they might malfunction and cause discomfort in your house. Homes are irritated and inconvenienced by a malfunctioning Nest thermostat.
​If there are structural or mechanical issues with your Nest thermostat, an AC repair specialist will be required to either fix it or replace it. Here are a few issues that frequently arise with Nest thermostats.
Picture

Low Battery Issues

​Verify whether the display on your Nest Thermostat is showing a blinking red light or a low battery warning. This implies that until the problem is fixed, the thermostat may experience difficulties maintaining its WiFi connection or may even cause the HVAC system to shut off.
Try using the wall charger USB cord to charge your Nest Thermostat if the problem persists and the blinking red light hasn't disappeared, or try plugging it in to a common wire transformer for power. To avoid issues, the thermostat's battery level needs to be higher than 20 milliamperes.

Hot Air Comes Out When Cold Air is Expected

​If hot air is expelled instead of cold air, the thermostat wires can be twisted. The issue can arise if you followed the wiring schematic of your old thermostat. The Nest Thermostat uses the heat pump row to provide heating and cooling, in contrast to your traditional thermostat.
Turn off the breakers and take a photo of the wire so you have a reference before attempting to work on the system's wiring. For help wiring through the heat pump systems, you may also open the interactive wiring tutorial by connecting to the Nest App.

Fan Running Continuously

The AC's ability to function normally will be impacted if the fan runs constantly. The fan will alternately turn on and off if your air conditioner is operating properly. An AC fan that runs constantly is a warning sign that something is wrong with your unit and that you should get AC repair services right away.
Water is released back into your home by an AC that runs nonstop rather than being blown outside. This puts stress on your system and thermostat as the AC works harder to remove the excess moisture. Prior to contacting Euless, Texas repair services, try any of the following fixes to remedy the issue:
  • Switching the fan off
  • Resetting the thermostat to its factory settings.
  • Restarting the thermostat.
  • Cutting the power to the furnace.
  • Wire swapping at the terminal: Make sure the breakers are off before taking the thermostat display off. Reinstalling the Nest display and turning on the breakers can be accomplished by attaching the G wire to the Y1 terminal and vice versa. Additionally, make sure the fan is running when it should and the AC system is cooling properly.

There Is No Power to the “Rh” Wire

Can you imagine finding your air conditioning system broken all day when you go home after a demanding workday in the intense summer heat of Euless, Texas? Pretty annoying, huh? Thankfully, there's no need to fear if you own a Nest thermostat because of a fantastic feature that lets you know where to start when troubleshooting an error number.
An E74 error indicates that there is no power to the Rh Wire. Even the HVAC controls might give up at this point. However, a smart thermostat controller will assist you in identifying the problem.
When they see this error, some homeowners could become alarmed, believing the AC repair service provider will take their $100. It might not be the case, though, and you'll be shocked to learn that it's just a straightforward solution.
If you have an E74 report, your air conditioning system won't turn on. Typical causes of this issue include:
  • When an E74 mistake occurs, the first thing to do is to use a trip breaker. The E74 report may be displayed on your thermostat due to a tripped breaker. You can check the switch between the on and off locations to see if the breaker has tripped.
  • Inadequately linked Rc and Rh cables: The first thing to do when you see this problem is to examine the connection diagram, since it may show whether the display wire on the RH wire is missing. You can examine the RH wire by removing the display component. Particularly if this is the first time, it is imperative to make sure the wire is correctly placed and taut.
  • Blown fuse in the air handler: If the problem continues even after doing the aforementioned adjustments, it may be a blown fuse. In these situations, you can schedule a system inspection with an AC repair specialist. If the fuse is blown, you'll need a new one.

Thermostat Frequently Disconnects from WiFi

​There can be a problem with the Nest service or an excessively low battery when your Nest Thermostat won't connect to the WiFi. In addition, a missing C wire could be the source of the issue.
Try restarting your Nest Thermostat if it's connected to Wi-Fi on your other devices. Check to check whether the air conditioning system is down by opening the Nest app if that doesn't work. If there is still a problem displayed on the thermostat screen, try connecting the C wire or purchasing a new one.

Nest Button Failing to Click

​It frequently happens that the button won't click during the initial configuration, which could even result in a system reboot. This could occur if the back wires become obstructed. It's a good idea to trim long cables to make them less noticeable. Occasionally, the nest button may not click because the mounting disk is not firmly fastened to the wall.
Bulky cables may also have an impact on the nest button. To prevent improperly connected wires, it is therefore advised that the process be carried out by a professional. If you're a do-it-yourselfer, you can use wire cutters to cut and re-strip the cables. Fresh copper can be used by an AC repair specialist to work with and rewire the thermostat to its original state.

Nest Thermostat Displays a Delay Message

​A problem with the common wire or battery may be the cause of delays in the Nest Thermostat. To stop the notice from showing up on the thermostat display again, make sure the thermostat connectors have a C wire that will charge the Nest Thermostat continually.
It's time to contact an HVAC specialist to determine the cause of the problem if adjusting the thermostat wiring doesn't resolve it.

Sensor Failure

The purpose of Nest Sensor is to guarantee that homeowners in contemporary homes maintain a comfortable and balanced temperature. Because the sensors are positioned thoughtfully throughout the house, your Nest thermostat can adjust the temperature appropriately.
The AC system can reach optimal temperatures thanks to thermostats' ability to communicate with roughly six Nest sensors. But occasionally, you might observe that there are problems with the sensors' connections.
You don't need to call in an Alexandria, VA AC repair professional to troubleshoot the Nest Sensor if it is unable to connect or communicate with the thermostat. To begin with, place the sensors next to the thermostat and attempt to link them. It can also be reset.
The Nest sensor may malfunction for the reasons listed below:
  • The app's inability to track sensors
  • Inaccurate sensor and Nest Thermostat communication
  • The room cannot be properly heated or cooled by the AC unit as indicated.
​If you observe the aforementioned problems, the sensors may be the source of the issue. If the problem still exists after trying some simple troubleshooting, you can get expert AC repair services in Alexandria, VA to solve it.

Blinking Green Light and Lack of Response

​Most of the time, a blinking light signals a software update. Although it should only last a few minutes, there's a possibility the control board of the system froze if you see it lasting longer.
Try unplugging the Nest Thermostat from its base and giving it a second chance to operate. Software-related technical issues with programmable thermostats are to be expected.

The Thermostat Is Short Cycling

A nest thermostat that is short cycling turns off before the necessary temperatures are reached. Because your house won't be heated or cooled to the proper degrees, this can be annoying.
You shouldn't become alarmed if your Nest thermostat exhibits this issue, and in most circumstances, it doesn't even necessitate hiring an AC repair specialist. Some possible causes of short cycling on your Nest thermostat are listed below.
Old or Wrong Wiring System: In the event that your Nest thermostat begins to cycle on and off, you should inspect the wiring system first. The smooth flow of electricity to your gadget is impeded by loose connections from outdated wiring. To fix this problem, an AC repair specialist can replace or modify the cabling that connects the Nest thermostat to the air conditioning unit. The C-Wire may also be changed by the expert.
Damaged Fuse: While it is not a frequent problem with a Nest thermostat, it can occasionally occur and result in the thermostat turning on and off. It's a blown fuse that keeps the thermostat from working. Your thermostat will cycle on and off due to occasional power outages caused by a carelessly fitted fuse. To solve the issue, a qualified AC repair specialist can swap out the fuse.

Other reasons behind the cycling on and off of your thermostat include:

  • Old or Worn Out Batteries
  • Overheated furnace
  • Clogged filters are clogged.
  • Faulty thermostat
  • Oversized furnace
  • Poorly insulated furnace

Blinking and Unresponsive Thermostat

​Your Nest thermostat's blinking green light indicates that an update is being made to your software. The thermostat can be restarted in a matter of minutes. However, the system may be frozen if the thermostat is unresponsive and the green light is blinking for an extended period of time.
In these circumstances, the reconnecting display will illuminate when you take the thermostat out of the base and replace it. You can restart it by pressing the thermostat for a brief period of time if it breaks down.

Contact a Specialist You Can Trust

If none of the following DIY fixes work for your Nest thermostat, you should get in touch with a reputable AC repair specialist. Our team of skilled AC repair specialists at Heating Repair Alexandria of Fort Worth is equipped to service your Nest thermostat as quickly as possible. They also assist with tune-ups, preventive maintenance and repairs, emergency AC repairs, installation of air conditioners, and assessments of the efficiency of homes. Call us now for all of your Nest thermostat problems.
0 Comments

How to Turn off Hot Water Heater?

5/1/2024

0 Comments

 
Can you locate the water heater's shutoff button in the event of an emergency or significant leak? Unless you find yourself in a puddle, detect an unusual odour, or are preparing to replace your hot water heater, it is a straightforward undertaking that may not receive much thought.
Every homeowner should be familiar with this vital safety feature, regardless of whether they have a gas or electric water heater, a tankless water heater, or a conventional heater, ahead of time.
Please proceed with reading to discover the methods and timing for turning off the primary varieties of hot water heaters.
​
Picture

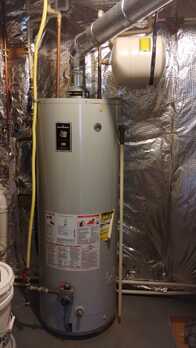
How to Turn off Traditional Tank Gas or Electric Water Heaters

To prevent damage to your home or system, you can follow these steps to turn off a traditional electric or gas hot water heater that is leaking or malfunctioning:
​Both the gas shut-off valve on the water heater and the main gas supply in the home should be set to the OFF position. Turn off the power switch and circuit breaker associated with the water heater in the case of an electric model.
Stop the valve lever by rotating the water supply to the unit in a clockwise direction. Turn off the primary water valve for your home as an additional precaution. (Here's how to locate your home's main water shut off valve!).
 Connect a standard garden hose to the drain tap located at the base of the water heater in order to prevent water damage to your residence. In a low location where it cannot be damaged by hot, rusty water, position the opposite end of the hose. Afterward, until water begins to flow from the hose, turn the drain tap counter-clockwise. Warning: this water could be extremely hot.
 Air can enter the tank while it is draining by pulling the pressure relief valve. Any hot water tap in your residence can produce the identical outcome.
Prior to an extended period of absence, it is prudent to turn off the traditional tank water heater in your residence. This protects not only the inner coating of your hot water heater's tank but also a significant water leak in the event of a tank malfunction.

After eight to twelve years, or longer, with proper maintenance, conventional gas and electric water heaters do not require replacement or repair. A good way to extend the life of your system is to turn off the unit whenever the main water supply is interrupted, including when you will be away.

How to Turn off an Electric Tankless Water Heater

A tankless water heater, alternatively known as an on-demand water heater, provides an inexhaustible supply of instantaneous hot water, in contrast to conventional tank water heaters. Tankless electric water heaters provide on-demand heating of cold water using internal heating elements, as opposed to storing the heated water in a sizable tank, which consumes a significant amount of energy.
Here’s how to turn off your tankless electric water heater:
Discover the breaker switch that regulates the water heater within the breaker box. Adjust its position to OFF.
Stop the flow of water to the main residence.
Situated in close proximity to or atop the water heater, locate the water supply valve. Achieve the OFF position by rotating the valve handle.

How to Turn off a Gas Tankless Water Heater

Gas tankless water heaters require a slightly different sequence of actions to operate in comparison to their electric counterparts, which can be easily accomplished by utilizing the circuit breaker in one's home.
Defeat the circuit breaker that provides power to the unit's control panel.
The gas supply valve that enters the unit must be turned off. Use the valve located near the gas meter
​ to deactivate the main gas supply to your home for added safety.
Stop the flow of water to the main residence.
Situated in close proximity to or atop the water heater, locate the water supply valve. Achieve the OFF position by rotating the valve handle.

When Should you Shut off your Water Heater?

​It is evident that promptly deactivating a water or gas leak in your water heater is of the utmost importance. But under what circumstances should you disable your system? We advise homeowners to disengage their water heaters for the following reasons, which occur most frequently:
A gas-powered system emits an odour of gas or produces a hissing sound.
Should a water heater repair be imminent,
In advance of installing a new water heater
For extended periods of time when you will be away from home
Should you experience a prolonged interruption in your water supply,
Additional Recommendation: In the case of a more recent on-demand water heater or tank system, the thermostat may feature a "LOW" or "VAC" setting. You will conserve a substantial amount of gas or electricity by reducing the temperature of your water heater to 50 to 70°. This convenience setting, in conjunction with the following plumbing advice, can assist you in conserving energy while safeguarding your residence during your prolonged absence from town.

Time for a Water Heater Repair? Just Call Heating Repair Alexandria!

It may be necessary to perform a system tune-up or replace your hot water heater if it is not heating as efficiently as it once did. Our knowledgeable residential plumbers at Burton can assist you in locating the most cost-effective and suitable on-demand hot water tank or heater system for your residence, family, and financial situation. Call Burton immediately to arrange service or to obtain a quote!
0 Comments

    Author

    Write something about yourself. No need to be fancy, just an overview.

    Archives

    May 2024
    April 2024
    February 2024
    December 2023

    Categories

    All

    RSS Feed

Local Service Areas

Alexandria, VA
​Annandale, VA
Arlington, VA
Burke, VA
Falls Church, VA
Springfield, VA

Hours of Operation

Monday - 24 Hours
Tuesday - 24 Hours
Wednesday - 24 Hours
Thursday - 24 Hours
Friday - 24 Hours
Saturday - 24 Hours

Sunday - 24 Hours

Navigation

Home
Services
About Us
Near Me
FAQ's
Contact Us
Free Estimate
Resources

Services

Air Conditioning Repair
Plumbing Repair
Tankless Water Heater
Furnace Repair
Heat Pump Repair
Heating Maintenance
Heating Unit Replacement
Emergency Heating Service
Indoor Air Quality Systems
Nest Thermostats
Commercial HVAC Service
Commercial Plumbing
Commercial AC and Furnace Services
Commercial Water Heater Service
​Commercial Heating Maintenance
Apartment Heating Repair
Commercial Rooftop Unit Services
Commercial Duct Cleaning
Commercial Heating Preventive Maintenance

Contact us

Picture
Heating Repair Alexandria
4931 Beauregard St, Apt 204, Alexandria, VA 22312 
(571) 568-6856

Terms of use | Privacy Policy | Sitemap
  • Home
  • Services
    • Residential >
      • Air Conditioning Repair
      • Plumbing Repair
      • Furnace Repair
      • Heat Pump Repair
      • Tankless Water Heater
      • Heating Maintenance
      • Heating Unit Replacement
      • Emergency Heating Service
      • Indoor Air Quality Systems
      • Nest Thermostats
    • Commercial >
      • Commercial HVAC Service
      • Commercial AC & Furnace Services
      • Commercial Water Heater Service
      • Commercial Rooftop Unit Services
      • Commercial Plumbing
      • Apartment Heating Repair
      • Commercial Heating Maintenance
      • Commercial Duct Cleaning
      • Heating Preventive Maintenance
  • About Us
    • How It Works
    • Why Choose Us
  • Near Me
    • Alexandria, VA
    • Annandale, VA
    • Arlington, VA
    • Burke, VA
    • Falls Church, VA
    • Springfield, VA
  • FAQ'S
  • Contact Us
  • Free Estimate
  • Resources
    • Business Listings
    • License and Certifications
  • Blog